Input of passport data to form APIS telegram
To form an APIS telegram correctly, the complete data on a passenger and a document, by which a flight was issued, is required. The data should come from the checkin system.
If not all the data came, the check-in agent should add this data in the Passenger check-in module.
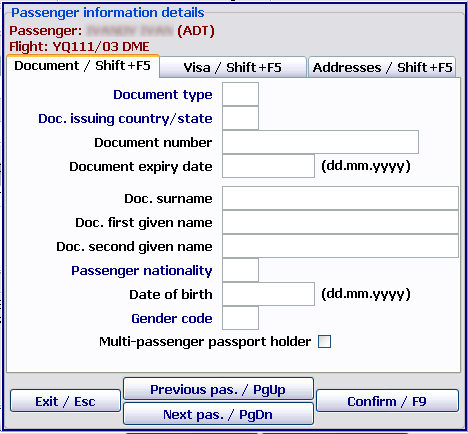
For this purpose, it is required to find the passenger by using the Surname search row, select the Document column and press the Space key. The Passenger information details form will be presented. It is required to fill in this form.
The detailed description of the form:
1. The Document/Shift+F5 tab
- Document type: code of a document type by which a passenger is flying is entered (to enter a code is possible manually or trough the F1 key).
- Doc. issuing country/state: code of a state issued the document is entered (to enter a code is possible manually or trough the F1 key).
- Document number: document number is entered (it is possible to enter figures and letters in Latin only).
- Document expiry date: document expiry date is entered (the entry format is specified in brackets; the date should not be earlier then the passenger check-in date). The example:
01.02.2011. - Doc. surname: surname of the passenger as it is specified in the document is entered (only in Latin).
- Doc. first given name: name of the passenger as it is specified in the document is entered (only in Latin).
- Doc. second given name: patronymic name of the passenger as it is specified in the document is entered (only in Latin).
- Passenger nationality: code of a state is entered (to enter a code is possible manually or trough the F1 key).
- Date of birth: date of birth of the passenger is entered (the entry format is specified in brackets; the date should not be later then the passenger check-in date). The example:
01.02.2011. - Gender code: gender of the passenger is entered manually or trough the F1 key.
- Multi-passenger passport holder: the given indication is set by the Space key if a child is travelling with parents with their passport.
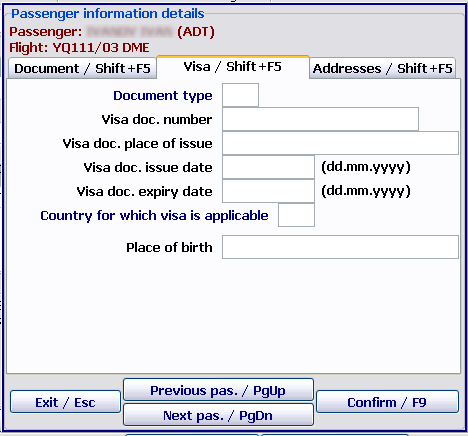
2. The Visa/Shift+F5 tab
- Document type: V is set by default (visa).
- Visa doc. number: visa number is entered (no more than 15 characters; figures and letters only).
- Visa doc. place of issue: city issued the visa is entered (no more than 35 characters; figures and letters; only in Latin).
- Visa doc. issue date: issue date of the visa is entered (the date should not be later then the passenger check-in date).
- Country for which visa is applicable: code of a host country is entered (to enter a code is possible manually or trough the F1 key).
- Place of birth: place of birth is entered (no more than 35 characters; figures and letters; only in Latin).
- Infant: the given indication is set by the Space key if a passenger type is INF.
After entering all data, it is necessary to return to the Passenger check-in window by pressing the Esc key and save the changes by pressing the F9 key.
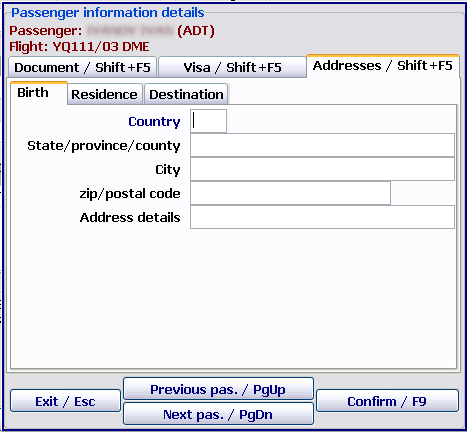
3. The Addresses/Shift+F5 tab
Passenger address entry. The given window is filled only for flights to the USA.
The "Addresses" window contains three tabs:
- Birth
- Residence
- Destination.
See also:
- Working with the module
- Monitoring of passenger check-in. List of checked in passengers
- Unaccompanied baggage
- Check-in closing and flight documentation printing
- Through check-in
- Check-in of passengers with PNR ID1/2, RG1/2,DG1/2, WL statuses
- Check-in for codeshare flights in DCS Amber
- Automatic association of transfer baggage on connection segments
- Working with EMD in the "passenger Check-in" module
- Check-in of a crew in the "passenger Check-in" module
- Appendix 1. Ways of describing baggage NORMS
- Appendix 2. Check-in request format
Other sections:
- Boarding module
- Seasonal Schedule Management Module
- Check-in Preparation Module
- Documentation module
- Statistics module
- History module
- EMDA Module
- Messages Module
- Access Module
- Baggage Payment Module
- Transportation Module
- Weight and Balance Module
- Web Check-in at a Cost Service
- Alarms Designations
- Self Check-in Kiosk Software
- Administration module


