Basic Operations on Working with Reports
Forming a Report
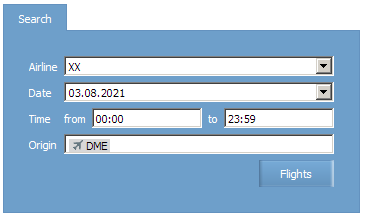
Forming a report starts with flights selection, information on which will be included into the report.
Flight search form is presented on selecting a report type from the main menu (Reports option).
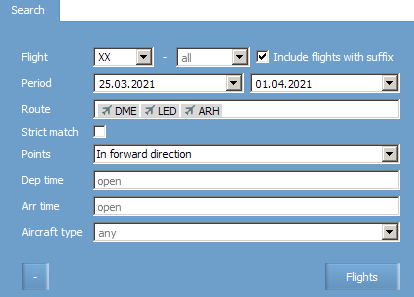
Fields Flight and Period are mandatory. Additional fields are presented on ![]() button pressed.
button pressed.
Fill in the search form:
1. Specify data (mandatory fields are marked):
- In the Flight* field specify carrier code and flight number. Flight number might be specified in the following formats: all flights of the carrier (all — by default), one number (e.g., 101) row of numbers (e.g., 100-190), both (e.g., 109,131,190-203) or a name of a flight group.
- Mark the Include flights with suffix field to include flights with suffix.
- In the Search period* field specify search period.
2. To set additional search parameters, press ![]() button.
button.
3. Fill in the form and press Flights. A report of the selected type will be presented on the screen.
Sorting Data
To sort data, click a column of a table with the indication name by which the data will be sorted. The data will be sorted in ascending order of values of the selected parameter.
To sort data in descending order of values of the same parameter, click the column once again.
The ![]() icon indicates that the data are sorted in ascending order, the
icon indicates that the data are sorted in ascending order, the ![]() icon indicates that the data are sorted in descending order.
icon indicates that the data are sorted in descending order.
Data Display
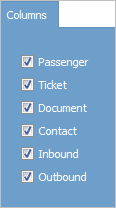
You may exclude some information from the report view by deleting the corresponding columns.
To exclude a column, press Columns button in the upper ring corner of the window and uncheck the boxes with data which is to be excluded. A set of boxes/columns corresponds to the report type and may differ.
The function is only available for some reports where it is applicable.
Data display settings are saved and will be active after the application is restarted.
To hide a column while viewing a report, wight-click on its name and select Hide option. You may include it again later using the Columns menu.
Viewing Requested Reports
Some reports may only be downloaded from the Reports → Requested reports section.
To download a report as an*.csv file:
1. Check the box Always ask where to save a report.
| Not necessary to check this box is a default way for downloaded files is specified in the Personal settings section. |
2. Select a report from the list and press Download.
3. Complete downloading process as a standard procedure.
The report will be saved as a *.csv file with commas as delimiters.
For instructions on this file converting to Excel format, see Quick Start.
Other System Sections
In the context menu according you may proceed to other system sections: inventory management (Inventory context menu item) and viewing pax list or PNR parameters (PNR context menu item) depending on the report type.
Learn more about reports:
- List of Flights
- Closed Flights
- Flight Information
- Passengers
- Passengers for Period
- Money Report
- Search Passenger
- Transfer Pax List
- Flights Avail Leg
- Flights Avail Segment
- Availability Display
- Airport Pax
- Arrival Airport Pax
- Flights Booking
- SSP Sales
Other sections:
- Schedule Management
- Inventory Management
- PNR Management
- Passenger Re-accommodation
- Carrier Settings
- Seatmaps and Sale with Seat Numbers
- Commercial Agreements Management
- System Queue Management
- Dictionaries
- User Rights and Roles
- Viewing Operation Archive
- Messages Searching and Viewing
- Charter Flight Creation


