Difference between revisions of "Ticket Information"
(Created page with "Ticket information is presented in the '''TKT''' section: center The following data are presented: *'''Passenger''': an identifier of a p...") |
|||
| Line 32: | Line 32: | ||
==Ticket Adding== | ==Ticket Adding== | ||
| − | {{Attention|This fucntion is only used if PNR syncronization with GDS is broken. You will need an approve from helpdesk to perform the operation (+7 (495) 363-32-72; [mailto:support@amber.aero support@amber.aero]). You may not add a ticket which is not accounted in ETS!}} | + | {{Attention|This fucntion is only used if PNR syncronization with GDS is broken. You will need an approve from helpdesk to perform the operation (+7 (495) 363-32-72; [[File: email.png]][mailto:support@amber.aero support@amber.aero]). You may not add a ticket which is not accounted in ETS!}} |
To add a ticket to a PNR: | To add a ticket to a PNR: | ||
| − | 1. Click Action in the upper right part of the PNR parameters screen and select Add Ticket option in the menu. A ticket adding window will be shown. | + | '''1.''' Click '''Action''' in the upper right part of the PNR parameters screen and select '''Add Ticket''' option in the menu. A ticket adding window will be shown. |
| − | 2. Choose a passenger entry in the Passenger field. | + | [[File: Ticket_Information-2.png|center]] |
| − | 3. Choose segment in the Segment field. | + | |
| − | 4. Choose account code in the Account code field. | + | '''2.''' Choose a passenger entry in the '''Passenger''' field. |
| − | 5. Specify ticket series in the Series field. | + | |
| − | 6. Specify ticket number in the Number field. | + | '''3.''' Choose segment in the '''Segment''' field. |
| − | 7. Specify coupon number in the Coupon number field. | + | |
| − | 8. Specify status of synchronization with e-ticketing system server in the Confirmed by ETS field. | + | '''4.''' Choose account code in the '''Account code''' field. |
| − | 9. Press OK. The ticket will be transferred to a chosen segment. | + | |
| + | '''5.''' Specify ticket series in the '''Series''' field. | ||
| + | |||
| + | '''6.''' Specify ticket number in the '''Number''' field. | ||
| + | |||
| + | '''7.''' Specify coupon number in the '''Coupon number''' field. | ||
| + | |||
| + | '''8.''' Specify status of synchronization with e-ticketing system server in the '''Confirmed by ETS''' field. | ||
| + | |||
| + | '''9.''' Press '''OK'''. The ticket will be transferred to a chosen segment. | ||
| + | |||
| + | ==Ticket Editing== | ||
| − | |||
To edit ticket information: | To edit ticket information: | ||
| − | |||
| − | Ticket information editing window | + | '''1.''' Right-click on a ticket section in the PNR parameters screen and select '''Change''' option in the cotext menu. Ticket information editing window will be shown. |
| − | + | [[File: Ticket_Information-3.png|center]] | |
| − | 3. | ||
| − | |||
| − | |||
| − | |||
| − | |||
| − | For the changes to take effect, save the changes in the PNR. | + | '''2.''' Specify account code in the '''Account code''' field. |
| + | |||
| + | '''3.''' Specify ticket series in the '''Series''' field. | ||
| + | |||
| + | '''4.''' Specify ticket number in the '''Number''' field. | ||
| + | |||
| + | '''5.''' Specify coupon number in the '''Coupon number''' field. | ||
| + | |||
| + | '''6.''' Specify status of synchronization with e-ticketing system server in the '''Confirmed by ETS''' field. | ||
| + | |||
| + | '''7.''' Press '''OK'''. Changes will be made to a PNR and marked in the ticket section of the PNR parameters screen. | ||
| + | |||
| + | For the changes to take effect, [[Actions with PNR#Saving PNR Changes|save the changes in the PNR]]. | ||
| + | |||
| + | ==Ticket Revalidation== | ||
| − | |||
Revalidation is transferring a ticket from one segment to another. | Revalidation is transferring a ticket from one segment to another. | ||
To revalidate a ticket: | To revalidate a ticket: | ||
| − | |||
| − | |||
| − | + | '''1.''' Right-click on the row containing information about a ticket in The PNR parameters screen. | |
| + | |||
| + | Select '''Move''' in the context menu. The window of editing the ticket information will be presented: | ||
| + | |||
| + | [[File: Ticket_Information-4.png|center]] | ||
| + | |||
| + | '''2.''' Select a segment to which the ticket will be transferred in the drop-down list in the '''Segment''' field. | ||
| + | |||
| + | '''3.''' to force the changes to be made to a ticket despite any contradictory conditions, check the Force ticket reservation change box. | ||
| + | |||
| + | '''4.''' Click '''OK'''. The ticket will be reserved in the selected segment. | ||
| − | + | In order for the changes take effect, [[Actions with PNR#Saving PNR Changes|save the changes in the PNR]]. | |
| − | |||
| − | |||
| − | + | ==See also:== | |
| − | + | *[[PNR General Information]] | |
| + | *[[Information about Passengers]] | ||
| + | *[[Segment Information]] | ||
| + | *[[Contact Information]] | ||
| + | *[[Other Service Information]] | ||
| + | *[[Special Service Information]] | ||
| + | *[[Seat Information]] | ||
| + | *[[Actions with PNR]] | ||
| − | + | ==Other sections:== | |
| − | |||
| − | |||
| − | |||
| − | Other | ||
| − | |||
| − | |||
| − | |||
| − | + | *[[Schedule Management]] | |
| + | *[[Inventory Management]] | ||
| + | *[[Passenger Re-accommodation]] | ||
| + | *[[Carrier Settings]] | ||
| + | *[[Seatmaps and Sale with Seat Numbers]] | ||
| + | *[[Commercial Agreements Management]] | ||
| + | *[[System Queue Management]] | ||
| + | *[[Flight Reports]] | ||
| + | *[[Dictionaries]] | ||
| + | *[[User Rights and Roles]] | ||
| + | *[[Viewing Operation Archive]] | ||
| + | *[[Messages Searching and Viewing]] | ||
| + | *[[Charter Flight Creation]] | ||
| − | + | [[Category:Amber Inventory]] | |
| − | Inventory | ||
| − | |||
| − | |||
| − | |||
| − | |||
| − | |||
| − | |||
| − | |||
| − | |||
| − | |||
| − | |||
| − | |||
Revision as of 18:01, 23 July 2021
Ticket information is presented in the TKT section:
The following data are presented:
- Passenger: an identifier of a passenger in the System
- Segment: designation of a route segment
- Ticket number: a ticket number
- Coupon number: a coupon number
- Confirmed by ETS: a status of synchronization with electronic ticketing system
- E-ticket status: to view the status click Show. The E-ticket status will be shown in the same filed
- A - aeroport control
- C - checked-in
- E - rebooked
- F – used
- L - boarded
- O - open for use
- P – printed
- R - refunded
- S – suspended
- T - paper ticket
- U - not available for use
- V – cancelled
- X - changed to paper ticket
- Z – closed.
| The period of data update for PNR's E-ticket status in Leonardo Inventory is 13 months from the flight departure date. |
Managing Ticket Information
Ticket Adding
| This fucntion is only used if PNR syncronization with GDS is broken. You will need an approve from helpdesk to perform the operation (+7 (495) 363-32-72; |
To add a ticket to a PNR:
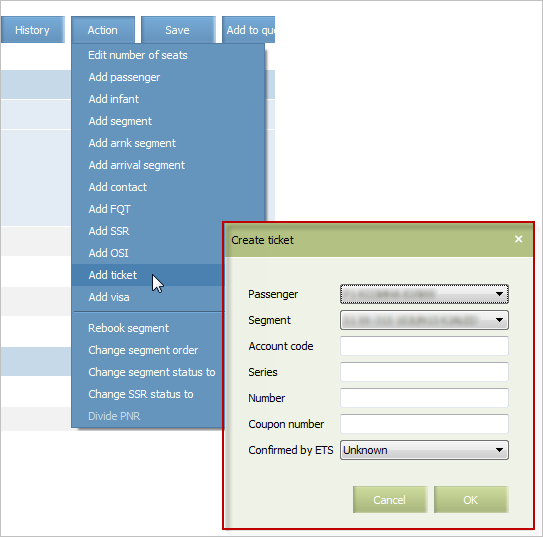
1. Click Action in the upper right part of the PNR parameters screen and select Add Ticket option in the menu. A ticket adding window will be shown.
2. Choose a passenger entry in the Passenger field.
3. Choose segment in the Segment field.
4. Choose account code in the Account code field.
5. Specify ticket series in the Series field.
6. Specify ticket number in the Number field.
7. Specify coupon number in the Coupon number field.
8. Specify status of synchronization with e-ticketing system server in the Confirmed by ETS field.
9. Press OK. The ticket will be transferred to a chosen segment.
Ticket Editing
To edit ticket information:
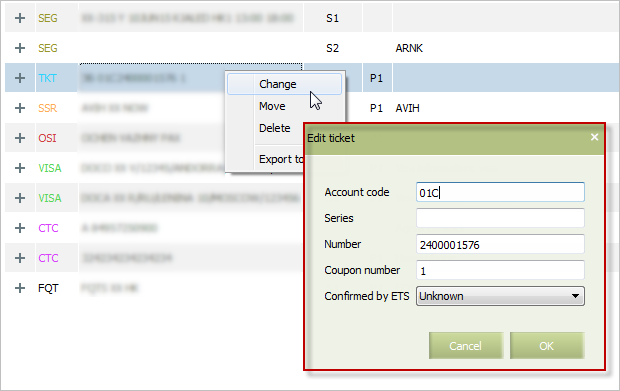
1. Right-click on a ticket section in the PNR parameters screen and select Change option in the cotext menu. Ticket information editing window will be shown.
2. Specify account code in the Account code field.
3. Specify ticket series in the Series field.
4. Specify ticket number in the Number field.
5. Specify coupon number in the Coupon number field.
6. Specify status of synchronization with e-ticketing system server in the Confirmed by ETS field.
7. Press OK. Changes will be made to a PNR and marked in the ticket section of the PNR parameters screen.
For the changes to take effect, save the changes in the PNR.
Ticket Revalidation
Revalidation is transferring a ticket from one segment to another.
To revalidate a ticket:
1. Right-click on the row containing information about a ticket in The PNR parameters screen.
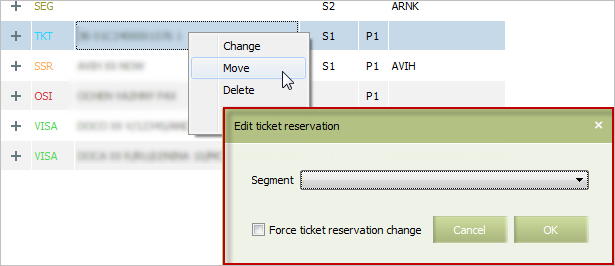
Select Move in the context menu. The window of editing the ticket information will be presented:
2. Select a segment to which the ticket will be transferred in the drop-down list in the Segment field.
3. to force the changes to be made to a ticket despite any contradictory conditions, check the Force ticket reservation change box.
4. Click OK. The ticket will be reserved in the selected segment.
In order for the changes take effect, save the changes in the PNR.
See also:
- PNR General Information
- Information about Passengers
- Segment Information
- Contact Information
- Other Service Information
- Special Service Information
- Seat Information
- Actions with PNR
Other sections:
- Schedule Management
- Inventory Management
- Passenger Re-accommodation
- Carrier Settings
- Seatmaps and Sale with Seat Numbers
- Commercial Agreements Management
- System Queue Management
- Flight Reports
- Dictionaries
- User Rights and Roles
- Viewing Operation Archive
- Messages Searching and Viewing
- Charter Flight Creation


