Difference between revisions of "OSI"
| Line 89: | Line 89: | ||
*[[Commercial Agreements Management]] | *[[Commercial Agreements Management]] | ||
*[[System Queue Management]] | *[[System Queue Management]] | ||
| − | *[[ | + | *[[Reports]] |
*[[Dictionaries]] | *[[Dictionaries]] | ||
*[[User Rights and Roles]] | *[[User Rights and Roles]] | ||
Revision as of 11:56, 27 July 2021
OSI is added to a PNR if it is specified by an agent and unavailable for editing in the System.
OSI is presented in the OSI section.
The following data are presented in the window:
- Passenger: an identifier of a passenger in the System
- Type: an OSI type
- Airline: a carrier code
- Text: an OSI text.
OSI Adding
To add OSI to a PNR:
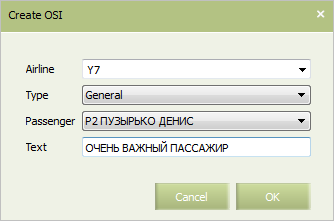
1. Click Action in the top right part of the screen and select Add OSI. The window of adding OSI to a PNR will be presented:
2. Specify values in the fields:
- Select a carrier code in the drop-down list in the Airline field.
- Select a OSI type in the drop-down list in the Type field.
- Select a passenger to whom the added OSI relates in the drop-down list in the Passenger field.
- Specify a comment of a free form in the Text field (a text content of the OSI).
3. Click OK. The OSI will be added to the PNR.
In order for the changes take effect, save the changes in the PNR.
OSI Editing
It is possible to edit a text content of OSI.
To edit OSI:
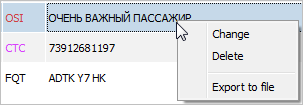
1. Select a corresponding record about OSI in the OSI section.
2. Right-click on the row and select Change in the context menu.
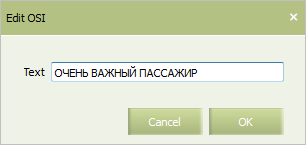
3. The window of editing OSI will be presented:
4. Specify a content of OSI in the Text field and click OK. The changes will be displayed in the corresponding section of the view screen of the PNR.
In order for the changes take effect, save the changes in the PNR.
OSI Deleting
To delete OSI:
1. Select a corresponding record about OSI in the OSI section.
2. Right-click on the row and select Delete in the context menu. The selected OSI will be marked in the list:
In order for the changes take effect, save the changes in the PNR.
See also:
- PNR General Information
- Information about Passengers
- Segment Information
- Contact Information
- Special Services and Ancillaries Information
- Ticket Information
- Seat Information
- Actions with PNR
Other sections:
- Schedule Management
- Inventory Management
- Passenger Re-accommodation
- Carrier Settings
- Seatmaps and Sale with Seat Numbers
- Commercial Agreements Management
- System Queue Management
- Reports
- Dictionaries
- User Rights and Roles
- Viewing Operation Archive
- Messages Searching and Viewing
- Charter Flight Creation


