Routine Operations in the Transportation Module
Getting Started
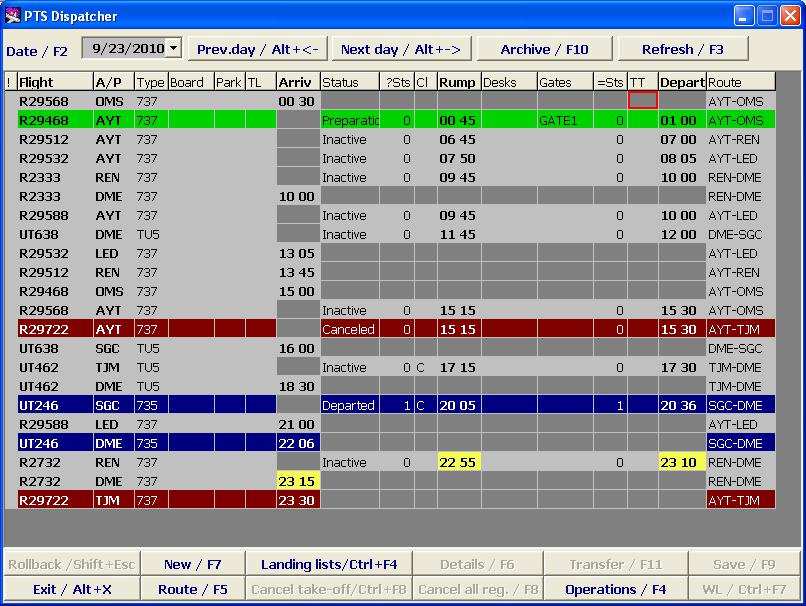
To start, click on the Transportation button in the main Module of the system. Example of the Module screen is shown on Figure 1.
The PTD Supervisor screen contain information about all flights included in the Daily Flight Plan for a particular date. The date selection is described in the General Provisions.
Each row in the flight table corresponds to a certain flight and contains the following information:
- Al – indicator of alarms in case of irregularities on the flight
- Flight – flight number
- A/P – sending airport
- Type – aircraft type
- Board – aircraft board number
- Park – departing aircraft parking place number
- TP – indication of availability of transfer passengers arriving by this flight
- Arrive – scheduled time of arrival in the base airport
- Status – flight status
- ?Seats – number of sold seats (reservation data)
- Cl – service classes (if empty, only Economy class)
- Steps – time of steps removal
- Desks – check-in desks assigned for the flight
- Gates – gates assigned for the flight
- =Seats – total number of occupied (checked) seats (subject to change during check-in process). Also the indication of re-boarding passengers and combining the passenger lists:
- "+" – passengers were added to the flight
- "-" – passengers were sent to another flight
- TP – indication of availability of transfer passengers departing by this flight
- Departure – time of departure
- Route – for departing flights, the flight route after the base airport; for arriving flights, the last departure station.
Also, the background color is of importance.
Meaning of colors:
Gray– inactive (nothing is going on with respect to this object)Green– active (some action is being performed, e.g., check-in, boarding, etc.)Blue– inactive (the action is completed)Yellow– flight delayedRed– flight canceled.
Gray, green and blue colors sequentially replace each other.
The screen buttons functions:
- Date/F2 – select the date to view a Daily Flight Plan (more detailed description of the date selection is given in the General Provisions)
- Yesterday/PgUp – move to previous date
- Tomorrow/PgDn – move to next date
- Archive/F10 – view archived flights
- Refresh/F3 – refresh the screen data
- Undo /Shift+Esc - undo the last operation
- Exit / Alt+X – exit from the screen
- New/Ctrl+F5 – enter a new flight
- Route /F5 – open the screen with detailed info about the flight destinations (see Section 4)
- Lists/Ctrl+F4 – open Passenger List for this flight (described in the General Provisions)
- Cancel departure/F4 – cancel flight departure (active only in case the flight departed)
- Details /F6 – open screen with info about stages and parameters of check-in (see Section 3)
- Check-out all/F8 – cancel check-in for the flight
- Transfer /F11 – open the screen with info about transfer passengers of the flight
- Operations /F7 – open the Activity log for the flight (the Activity log is described in the General Provisions)
- Save /F9 – save entered data
- WL/Ctrl+F7 – view the waiting list.
Assignment of Check-in Desks for the Flight
The desks can be assigned from the PTD Supervisor screen (Figure 1).
It is possible to assign several check-in desks entering them one after another. Depending on system settings, the main check-in desk may be assigned.
The procedure of check-in desks assignment:
- 1st method: Keyboard input
- Place the cursor in the Desks area of the selected flight.
- Press Spacebar to start editing.
- Type the desk name (if several desks, type their names separated by space).
- Press F9 to save changes.
- 2nd method: Selection from the list of desks
- Place the cursor in the Desks area of the selected flight.
- Press F1: The list of desks will open (in more depth described in the System Administrator Instruction).
- Place the cursor on the row with the desk you need.
- Press Enter, the list will close, and the selected desk will appear in the Desks area.
- If necessary to enter the names of other desks, repeat the above mentioned actions.
- Press F9 to save changes.
To view the list of entered desks (if there are several), place the cursor in the relevant box of the desks list, and you will see the tool-tip containing all desks listed in this box.
See also:
- Work with the Technological Schedule, Flight Parameters (Passengers Screen)
- Working with the Flight Route (the Flight Details Screen)
- Working with Waiting List
- Display of Passenger Lists for Arriving Flights
- Alarms and Definitions in DCS Amber
Other sections:
- Boarding module
- Seasonal Schedule Management Module
- Check-in Preparation Module
- Check-in module
- Documentation module
- Statistics module
- History module
- EMDA Module
- Messages Module
- Access Module
- Baggage Payment Module
- Weight and Balance Module
- Web Check-in at a Cost Service
- Alarms Designations
- Self Check-in Kiosk Software
- Administration module
