Booking form
Jump to navigation
Jump to search
Overview
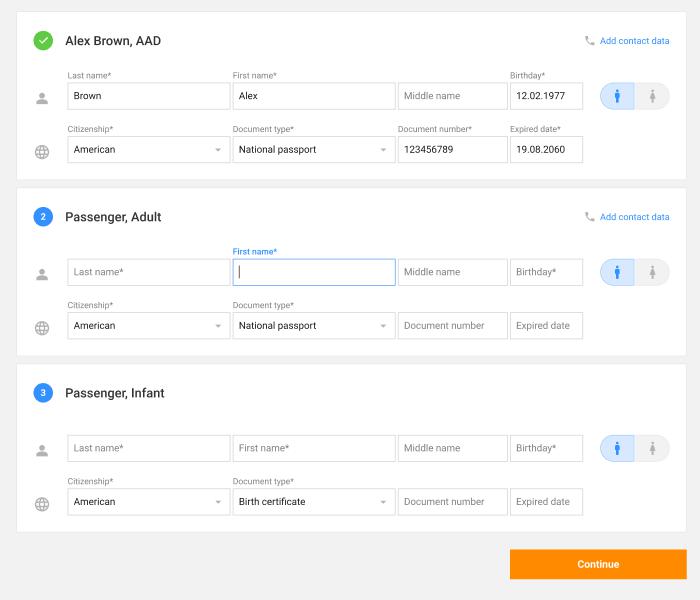
The booking form is a step of entering passenger data. The screen will display passenger identification cards in the number of passengers searched for.
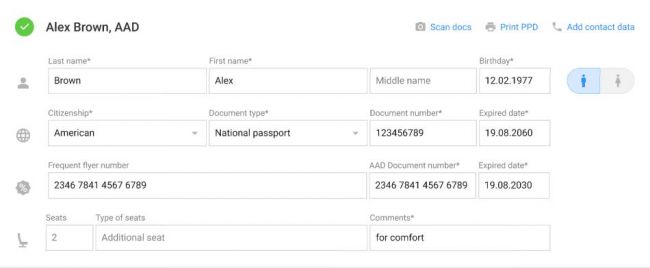
For each passenger there is a card with its own fields:
- Mandatory fields - strictly necessary for PNR registration:
- - Passenger last name.
- - Passenger name.
- - Date of birth.
- - Gender.
- - Nationality.
- - Type of document giving the right to make a booking.
- - Date of expiry of document giving the right to make a booking, if the document type stipulates.
- - Contact phone number for first adult passenger.
- - Contact email for first adult passenger.
- Optional fields - optional fields that are not required for mandatory PNR registration:
- - Passenger's middle name.
- - Contact phone number for other passengers (except INF|INS).
- - Contact email for other passengers (except INF|INS).
- Blocked fields - fields that contain information that cannot be edited at the current step. To edit them you must move to the corresponding step.
- - Passenger category. To change the category you should start a new search.
After the corresponding data for creating a booking are entered, you should press "Continued".
MRZ recognition form
Is a popup window that opens when you click on the "Scan docs" link. This link is displayed in the form for entering the contact data of each passenger.
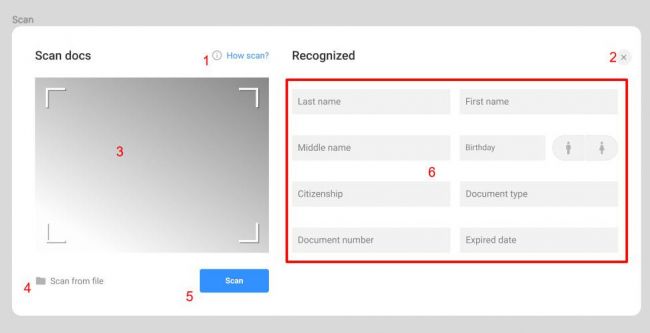
Clicking the button opens a popup window of the same name:
Functional Elements:
- "How scan?" tooltip, which, when clicked, opens a tooltip with an explanatory image and text.
- A button to close the recognition window.
- Image output area from the camera. If there are no suitable video capture devices or the user has denied access to the camera, this area displays the message "We were unable to find a web camera. Please make sure you are using the latest version of your browser, or you can use the Download Document from File option.
- The "Scan from file" button for recognizing a document saved on a PC. Acceptable file types: JPEG, PNG, GIF.
- The "Recognize" button, when pressed, captures the image from the camera and transmits the image for recognition.
- Fields with passenger information, in which the information is filled in after recognition.
Obtaining recognition results
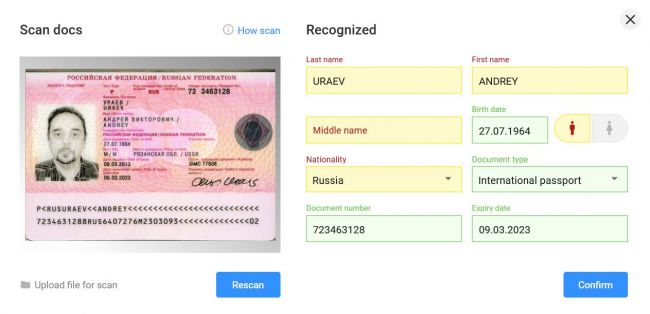
- The left part of the window displays the image which was transferred to recognition.
- The right part of the window displays the recognized data:
- fields with 100% accuracy of recognition are highlighted in green (the recognition accuracy is checked using the MRZ checksum)
- fields which require checking, are highlighted in orange. These are usually fields, for which there is no checksum (e.g., first and last names).
- If the field is empty, it is either not recognized due to bad photo quality, or this information is not in the MRZ.
- When you click Confirm, the window closes and the fields from the Recognized block are substituted in the form with the passenger's data.
- If the result of recognition is not satisfactory to the user, pressing the button "Rescan" resets the fields in the Recognized block and lets the user make a new photo or load an image from the PC.
Supported MRZ types
- - TD1 (ID card in CIS countries, e.g. Kazakhstan)
- - TD2
- - TD3 (national and international passports of many countries )


