Queue Processing
The queue management presents a control process over arriving notifications and implementation of actions on removing the occurred event.
The basic operations of the queue management consist of:
- Viewing notification details
- Proceeding to the object of the System which requires adjustment
- Deleting a notification
- Reject message reprocessing.
In addition, it is possible to adjust parameters of viewing queues at the level of a user. The personal settings consist of:
To view notifications contained in a queue, select the menu section Messages → Queues → Processing.
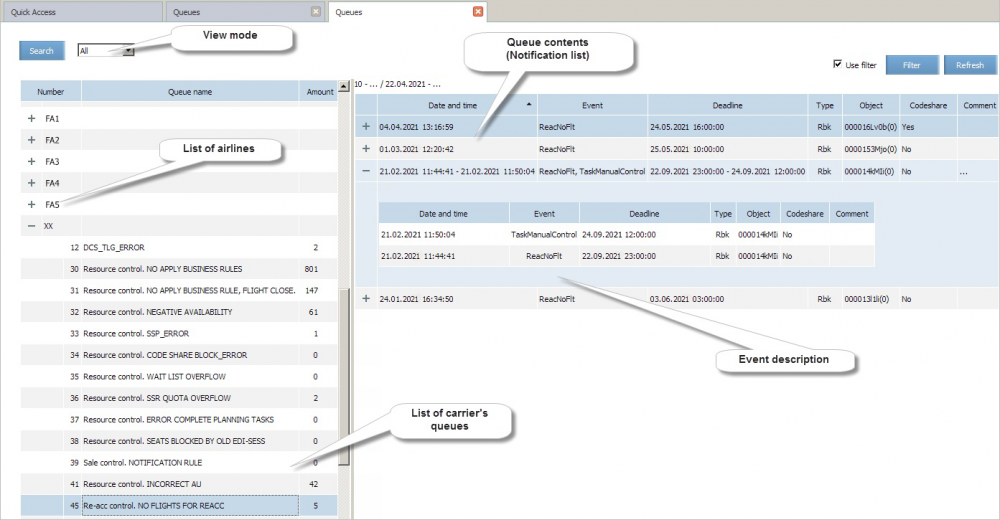
The queues processing window will be presented.
The following areas are presented in the window:
- View mode (all queues or not empty only)
- List of queues grouped by a carrier
- Area of viewing and managing notifications.
Processing queues involves actions on notifications contained in a queue:
- Viewing a queue content
- Changing an object of the System in accordance with data of a notification and subsequent resending of the notification
- Deleting a notification.
Display Mode
It is possible to limit the list of displayed queues during queues processing by selecting one of the two view modes:
- All: to display all queues in the list
- Not empty: to display only those queues in the list which contain at least one notification.
To set a view mode, select a value from the drop-down list in the top left part of the window of processing queues. The queues according to the selected view mode will be presented in the list.
Setting a Filter
About Queue Filter
It is possible to set the filter for the queue view screen by the following parameters:
- Flight: to display queues which contain notifications of the selected flight of selected carrier only.
- Queue number: to display queues with the specified numbers only.
- Group by critically level: sort the list of notifications in accordance with the number of days before flight. More critical events to show at the beginning of the list, less critical - towards the end.
Filter Screen
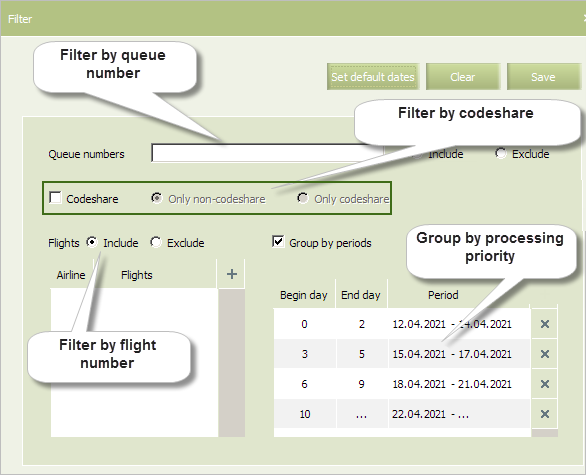
To proceed to a filter screen, click Filter in the top right part of the screen of processing queues. The window of setting the filter will be presented:
Filter by Queue Number
To set a filter by a queue number:
- Specify queue numbers in the Queue Numbers field.
- Choose filter type option: Include (include specified queues into a filter) or Exclude (exclude specified queues from a filter) as shown on Figure:
Using this option you may include in filter flights by the following criteria:
- only flights carried out within codeshare agreement
- only non-codeshare flights (prime).
To activate the option, check the Codeshare box and select one of the radio buttons.
Setting a Filter by Flight Numbers
To set a filter by a flight number:
- Click
 and specify a carrier code and flight numbers in the fields
 - Choose filter type option: Include (include specified flights into a filter) or Exclude (exclude specified flights from a filter).
Grouping by Processing Urgency
To group the queues by processing urgency:
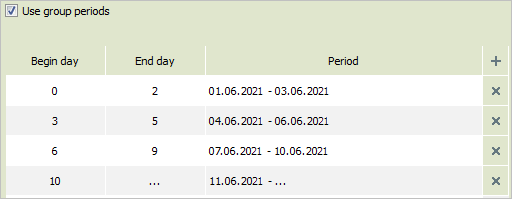
- Check the Use group periods box
- Add in a descending of processing urgency order the following information for each period:
- Begin day — number of days before days departure (period start)
- End day — number of days before days departure (period end).
The Period field will be automatically filled according to the specified data.
There are shown four periods of processing urgency on the figure:
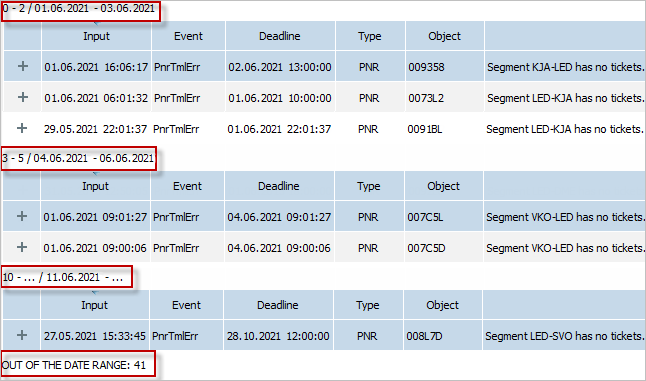
- 0 to 2 days before flight departure — notifications with PNRs within this period will be shown in the top on the notification list
- 3 to 5 days before flight departure
- 6 to 9 days before flight departure
- 10 and more days before flight departure.
As this filter is applied in the notification list will be stated in which of periods the selected notifications are included.
In the OUT OF THE DATE RANGE category the number of notifications with the expired departure date is shown. If the Deadline attribute is not specified then such notications are not deleted from the list automatically. To view such notifications disable filter settings.
Filter Saving and Applying
To save filter settings press OK. The filter conditions will be saved but not yet applied.
To apply filter settings to a queue list mark the Use filter box in a filter settings area on the queue processing screen. Then only those queues which match the filter settings will be displayed in the list.
Next:
- Queues Content. Notifications List
- Queue Notification Processing
- Viewing Queue Management Operation History


