Working with incoming messages
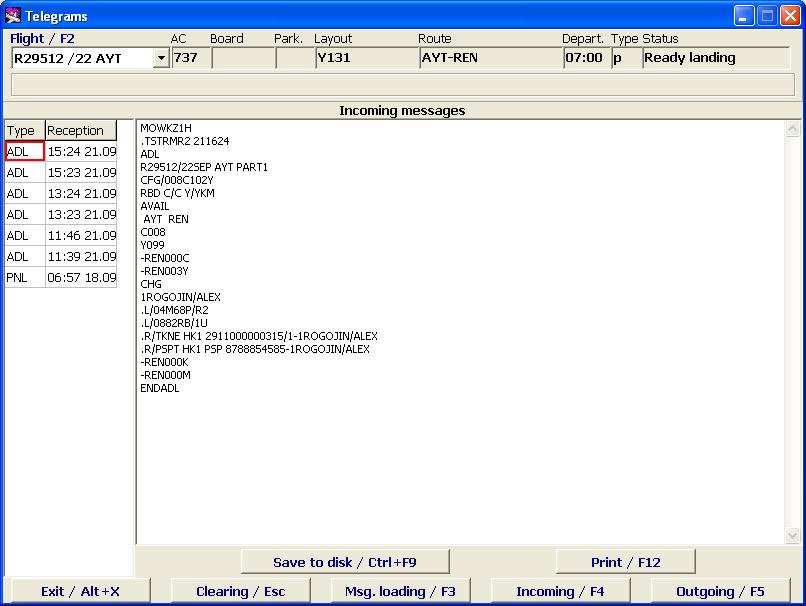
To view the incoming messages, select the flight and click on the Incoming/F4 button. The list of incoming messages will open (Figure 3). The list of messages is automatically updated every 5 minutes; to update it manually, click on the Incoming/F4 button.
The Incoming Messages window description:
- Flight/F2 – airline designator and flight number, additionally the departure date and airport can be indicated (depending on settings)
- Aircraft – aircraft type designator according to the aircraft index
- Board – board number
- Park – aircraft parking place number
- Layout – layout designator of this flight
- Route – codes of destination points after the base airport according to the city index
- Departure – time of departure
- Type – flight type
- Status – flight status.
Additional info may be displayed below the Flight info area.
The list of messages:
The list of accepted messages will be shown in the left part of the screen, with indication of their type and time of acceptance.
- Type - message type
- Reception – time and date of message acceptance (for a message combined from several parts, it will be time of acceptance of the latest part)
When the cursor is placed on the row with a particular message, the text of the message will be displayed in the right area of the window.
Message text:
Message text is generated in accordance with the IATA standards; there is particular standard for each message type.
Functions of the Incoming Messages screen buttons:
- Save to disk/Ctrl+F9 – save the message on the computer hard disk
- Print/(Alt)+F12 – print out the current message or set up the printer (printing setup is described in detail in the General Provisions)
- Exit/Alt+X – exit from the Module
- Clear/Esc – clear the screen (reset information)
- Load MSG/F3 – load a message from the disk
- Incoming/F4 – view the incoming messages for the flight or update the information about incoming messages
- Outgoing/F5 – view the outgoing messages for the flight
Saving messages on the hard disk
Messages are saved on the disk the same way as other files. Message files have the extension *.tlg. To save a message on the disk, place the cursor on this message in the list of messages and click on Save to disk/Ctrl+F9. The standard browser window will open; select the path to the desired folder.
Downloading messages from the disk
The system allows to download PNL and ADL messages manually from the disk (diskette). To do this:
- select the flight;
- select the incoming messages (Incoming/F4 button);
- open the standard browser window for file selection (Load MSG/F3 button) and select the message file.
You can download both combined messages and their parts. Message volume (number of parts) is unlimited. The result of downloading (and analysis) will be visible not immediately, as the processes of reception and analysis of messages run at regular intervals (initially every 30 seconds, but it can be manually changed on the basis of the system work load).
Please note, that the downloading of certain message types must be in accordance with the general order of the reception and analysis of PNL, ADL messages for the flight, otherwise some information contained in the messages may be ignored (e.g., passenger names in the second full name PNL). Also please take into consideration that identical messages will be ignored and time of message generating (specified in the message text) will influence on the numerical messages analysis and flight load update.
Handling non-associated and not analyzed messages
Use the filter to handle messages non-associated with a particular flight or not analyzed. The filter is active for incoming messages.
To start the filter, open the Messages Module, select "Non-associated" by pressing F2 and click on «Incoming/F4».
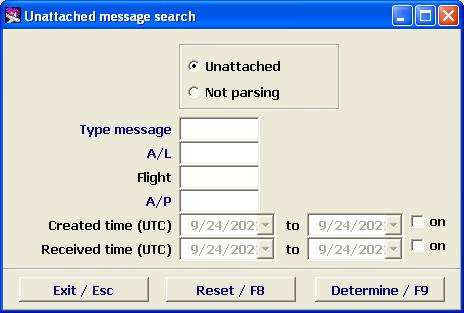
The filter window will open:
- Non-associated — messages which are received by DCS Amber, but they did not find the respective flight in the DFP.
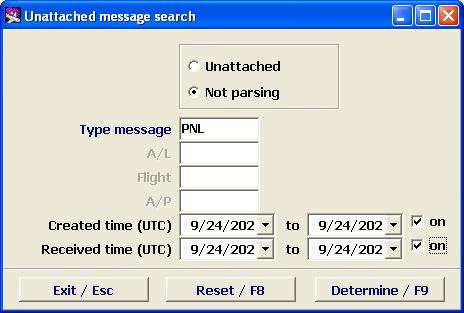
- Not analyzed — incorrect messages which are received by DCS Amber, found the respective flight, but it was not possible to analyze them. For example, due to mistake in the message format.
- Message type — enter the message type for search (type in or select by pressing F1).
- A/L — enter airline designator (type in or select by pressing F1).
- Flight — enter flight number (type in).
- A/P - specify departure airport (type in or select by pressing F1).
- Generation date — input the generating time via the calender, only if "on" box is checked. (Search period should not exceed 7 days).
- Reception date - input the reception time via the calender, only if "on" box is checked. (Search period should not exceed 7 days).
If "Non-associated" is selected, the search data input will be limited to message type and the date of generating and dispatch.
After all necessary search parameters are specified, fix the search parameters by clicking on Determine/F9 button. After that the search results will be displayed.
To reduce search time, enter the maximum number of parameters in the filter window.
In case if the number of found messages exceeds 2000, the system will give the warning message: "The number of found rows exceeds 2000". It is recommended to make the search criteria narrower.
Associating with the flight of non-associated messages
To associated a non-associated message with the flight, save it to the disk, then open the respective flight and download the saved message. The message will be associated with this flight.


