"Book a flight" module
Overview
"Book a flight" module "Book a flight' module is intended to search for a flight, get its cost, select additional services, and book and pay for the selected flight and services.
By default, the following sequence of actions is offered to the user:
- Search and select the flight options.
- Select additional services.
- Enter passenger details.
- Pay the order.
Each action/stage corresponds to a separate page and a set of features. For user comfort, the stage of entering the passenger details includes:
- Simplified registration in My account;
- Sending the traffic documents to the e-mail address of the passenger;
Searching for flight options
This feature enables the user to form a request with the following basic parameters:
- Departure place;
- Arrival place;
- Date of departure;
- Date of return (if necessary);
- Number and category of passengers;

Departure/Arrival points
These parameters can be set both manually or selected from the search menu.
Manual data entry:
Entering the first letters or IATA code of the city or airport in the relevant field of Departure/Arrival place (regardless of the interface language) starts the dynamic search in the directory of cities and airports (Fig. 005).

If the user made a mistake when typing the Departure/Arrival place or this place is not entered in the directory, a relevant message will be displayed, saying that the airline company doesn’t fly from or to the entered location (Fig. 006).

![]() Directory of cities and airport is uploaded from the airline’s reservation system.
Directory of cities and airport is uploaded from the airline’s reservation system.
Search in the menu:
Search menu is accessed by clicking on the "From" or "To" field (Fig. 007).

A popup window may include three basic section:
- "Airports Near Me" - city/region (identified by the user’s geolocation).
- "You searched" – if the user has already generated requests using this module, the corresponding cities (not more than three) will be indicated.
- "Top Destinations" - defined based on the analysis of the schedule of the airline company.
At the carrier’s discretion, the number of the above sections may be reduced (Fig. 008) or not used at all; in such a case, the destinations will be sorted alphabetically (Fig. 009):


![]() When the user first enters the site, he/she if offered to allow access to his/her geo location.
When the user first enters the site, he/she if offered to allow access to his/her geo location.
This data is then used to offer the closest airport of departure.

If the user denied access to his/her geo location, the "Airports Near Me" section will be excluded from the selection menu.

On the left, there is a "Select Country" section, listing all the countries to/from which the airline company flies.
On the right, there is a "Select City" section, listing all the cities to/from which the airline company flies with respect to the country selected in the left section.
The user can switch the places of departure and arrival by clicking the ![]() button located between the relevant fields (Fig. 012).
button located between the relevant fields (Fig. 012).
![]()
An additional option to search for a "Multi-City Route" (making a route different from standard OW (one-way trip)/RT (roundtrip)) is activated by "Set multi-city route" link (Fig. 013).

In this case, the management tools are as follows:
- + button (Fig. 014) required to add search modules to each additional segment of the flight within the Multi-City Route.

![]() Maximum 6 segments of the flight are available to create a Milti-City route.
Maximum 6 segments of the flight are available to create a Milti-City route.
(The number of segments is controlled by the possibilities of the airline’s reservation system and is not a fixed parameter).
- Х button (Fig. 015) to adjust the number of modules by deleting the irrelevant ones.

The user can return to the standard search by clicking the ‘Set simple route’ link (Fig. 016). Herewith, the data already entered into the additional modules will be deleted.

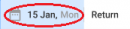
Selecting Departure and Arrival dates
This feature is available using the Calendar.
A OW (one way) route is set by default(Fig. 017):

Clicking on the ‘Departure Date’ field (Fig. 017) will open a calendar in the pop-up window.
In this case, the ‘Departure Date’ field is switched to two fields: ‘To’ and ‘From’ (Fig. 018):

![]() The calendar displays three months, starting with the current calendar month, with a possibility to move 11 months forward.
The calendar displays three months, starting with the current calendar month, with a possibility to move 11 months forward.
Scroll the calendar by pushing the arrow buttons on the right and left of the calendar: 
The dates of flights to the selected destination are highlighted in the calendar body according to the current flight schedule of the carrier (Fig. 019):

![]() The dates in the calendar body are highlighted with the font colour, background fill, etc.
The dates in the calendar body are highlighted with the font colour, background fill, etc.
The lowest preliminary prices may be displayed per 1 passenger for OW route for each stage of selecting the ‘To’ and ‘From’ dates respectively (Fig. 020):

![]() The prices displayed in the calendar are taken from the loaded cache of the requested destination.
The prices displayed in the calendar are taken from the loaded cache of the requested destination.
The current prices may differ from the ones specified in the calendar.
The cache is filled by the reservation system only in case of a relevant agreement for its support between the carrier and the reservation system itself.
The indicators of To and From dates are used to help the user visually navigate in the calendar at this stage of selection.

There’re three ways to close the calendar if the From date is not required
 button in the bottom part of the calendar (Fig. 018);
- Double click on the ‘To’ field with the selected date
 ;
; - Click on any inactive field of the page;
![]() It is not possible to set the From date earlier than the To date.
It is not possible to set the From date earlier than the To date.
If trying to do so, the To and From date will automatically be set to one and the same date.
Such a case is displayed in the calendar as shown on Fig. 022.

Number and category of passengers
The default search parameter is set for 1 adult passenger (Fig. 023).
![]()
The user can adjust the number of passengers by their type (adults, children under 12y.o., infants without a seat, etc.) in the drop-down window (Fig. 024).

![]() The airline company provides the list of categories of passengers for whom flights search and booking are available.
The airline company provides the list of categories of passengers for whom flights search and booking are available.
![]() The maximum permissible number of passengers for flight booking is set by the airline company, but cannot exceed 9 people.
The maximum permissible number of passengers for flight booking is set by the airline company, but cannot exceed 9 people.
Moreover, it is not possible to book a flight for more than one infant per one adult. Minors are not allowed to travel without accompanying adult.
When the user has made his/her choice, the search for flight options is started by pushing the ![]() button (Fig. 025).
button (Fig. 025).

Selecting flight options
The user is offered to select the best suitable flight option on the search results page.
The following is available for the user:
- A sequence of stages/steps starting from the selection of flight to payment of the booking (Fig. 026):
![]()
- Price calendar (Fig. 027):

- Information about the search parameters specified in the previous step (Fig. 028):

- An offer with the lower cost of flight (if available) (Fig. 029):

![]() Following this link will start a new search based on the proposed parameters.
Following this link will start a new search based on the proposed parameters.
- A section with flight options, sorted by departure time and minimum prices for the selected date.
Price calendar
Can be displayed in two ways:
- Week.
The weekly calendar shows the price range for To and From flight for a week +/- 3 days from the dates of departure or arrival specified in the search (Fig. 030):

- The selected date is highlighted.
- The dates when there are no flights to the selected destination become inactive.
- The dates with the lowest cost of the flight are marked with a checkbox.
- Scrolling for a week forward/backward is carried out by clicking on the arrow button on the right/left of the calendar.
![]() Selecting a date that is different from the previously selected in the calendar will start a new search for flight options.
Selecting a date that is different from the previously selected in the calendar will start a new search for flight options.
- Month.
The monthly calendar displays the prices for the month corresponding to the date of departure set by the user at the stage of searching for flight options.
Hovering the mouse over a date in the calendar will activate a tip with the lowest available cost of the flight on that day (Fig. 31).

- The tip on the left shows the highest and the lowest price for the given month.


- The dates with the lowest price in the calendar line are highlighted, other dates are not highlighted.
The dates on which there is no flight to the selected destination become inactive. 
- Scrolling for a month forward/backward is carried out by clicking on the arrow button on the right/left of the calendar.

If the user clicks on the month at the top of the calendar, the information on the lowest prices with a breakdown for 9 months forward, starting from the current calendar month, becomes available in the pop-up window (Fig. 32):

The names of the months in this window are clickable. They open the price calendar for the corresponding month.
Information on previously set flight parameters
The user can change the parameters either by clicking on the text with general information or on the ‘Modify search’ button (Fig. 33):

The modify search bar is completely similar in its functions to the search bar on the main page (Fig. 034):

![]() If the user decided not to change the search parameters, he/she will need to repeatedly click on the text with general information or on the ‘Modify search’ button, and the search bar will be hidden.
If the user decided not to change the search parameters, he/she will need to repeatedly click on the text with general information or on the ‘Modify search’ button, and the search bar will be hidden.
At this stage of selecting flight dates, the user can change the display of the calendar from standard to monthly by clicking on the ‘Monthly Price’ link at the bottom of the calendar (Fig. 035):

After making the necessary changes, the user shall start the search again.
![]() The possibility to change the calendar display is optional. At the carrier’s discretion, it can be disabled.
The possibility to change the calendar display is optional. At the carrier’s discretion, it can be disabled.
By default, the calendar does not display previously made selection of flight dates. At the carrier’s discretion, this tooltip can be activated.
Flight options section
This section is a summary table of the available flight options for the specified date and the lowest available fares in the economy and business classes for each option, respectively (Fig. 036):

![]() At the carrier’s discretion, the section with flight options can display the lowest fare only for the economy class (Fig. 037):
At the carrier’s discretion, the section with flight options can display the lowest fare only for the economy class (Fig. 037):

If for some reason the user has sent a request for the date on which there is no flight on the selected route or the flight is sold out, a corresponding notification will appear on the search results page (Fig. 038):

By default, the list of flights is sorted by departure time from earlier to later.
The sorting parameter can be changed at the request of the user through the drop-down menu under the ‘Sort by’ link in the upper right corner of the section (Fig. 039):

The following sorting options are available:
- By departure time;
- By arrival time;
- By price;
- By flight time;
The bottoms-up principle remains unchanged.
The following information is available for each flight option:
- Time of departure / arrival;
- Flight operator;
- Flight number;
- Airport and city of departure / arrival;
- Terminal of departure / arrival;
- Number of transfers / landings (if any);
- Flight time;
- Transfer / stop time (if any);
- Type of aircraft;
- List of available services on board;
Additionally, the lowest available price for each flight option is indicated.
Full details are available by clicking on the ‘Details’ button (Fig. 040):

The link to the image of the aircraft shows the reference information on the type of aircraft, including the appearance of the aircraft and the cabin, general technical specifications, a map of seats, etc. (Fig. 041):

![]() Such information is provided by the airline company. Its availability and its content is not mandatory and can be adjusted at the carrier’s discretion.
Such information is provided by the airline company. Its availability and its content is not mandatory and can be adjusted at the carrier’s discretion.
Information on the Fare families or groups of fares available on this route and on services included in the fare and / or provided for an extra fee, is available by clicking on the field with the lowest cost of the flight (Fig. 042):

The following symbols (‘avatars’) may be used for visual perception:
 Cabin baggage
 Check-in baggage
 Special meals
![]() Seat reservation
Seat reservation
 Ticket exchange before departure
 Ticket return
 Frequent Flyer Miles Award
 Service is included in the fare.
Paid service
Service is included in the fare.
Paid service
Clicking the ‘i’ (information) near the name of the fare family will open a comparison table in the pop-up window,
which allows the user to get a visual representation of the difference between the fare families (Fig. 043):

Clicking the ‘View full fare conditions’ link will open the detailed description of the differences between the fares.
![]() Such information is provided by the airline company. Its availability and its content is not mandatory and may be adjusted at the carrier’s discretion.
Such information is provided by the airline company. Its availability and its content is not mandatory and may be adjusted at the carrier’s discretion.
The user can select the fare itself both in the window displaying the flight details and in the window displaying the fare family (Fig. 044):

When the fare is selected, it will be fixed at the top of the page (Fig. 045), and the user will be allowed to make similar selection for the From flight,
if requested, or for the next part of the Multi-city route, if the search with a Multi-city route was initiated.

When the selection is made, the information on all the selected flights and the total cost becomes available to the user (Fig. 046):

- By clicking the ‘Fare rules’ link (Fig. 047), the user can check out the fare rules posted in the airline’s reservation system (Fig. 048).


- Clicking the ‘Baggage info’ (Fig. 049) will open a fare comparison table (Fig. 050), which is also available by clicking the ‘i’ (information) button next to the name of the fare family at the previous step of fare selection (Fig. 042).


- Clicking the ‘Change flight’ link (Fig. 051) will open a price calendar to compare the prices and select another flight date (Fig. 052)


![]() Following the ‘Change flight’ link (Fig. 051) will return the user to the flight selection page, thus automatically cancelling the previously selected flights and services.
Following the ‘Change flight’ link (Fig. 051) will return the user to the flight selection page, thus automatically cancelling the previously selected flights and services.
Follow the ‘Continue’ link (Fig. 053) to go to the selection of additional services.

Selecting additional services
This stage is divided into three main steps:
- Seat reservation;
- Adding extra baggage;
- Selecting the meals on board;
![]() Availability of this stage and the set of services are set by the carrier.
Availability of this stage and the set of services are set by the carrier.
The section with flight search results is fixed at the top of the page (Fig. 054),
allowing the user to check out the flight details at any time or initiate a new search with updated parameters:

Seat reservation
Selecting the seats in the cabin.
At this step, the user can reserve a specific seat in the cabin for each flight segment,
to check out the characteristics of the seats and the cost of this service.
![]() At the carrier’s discretion, the Pre-seating function can be activated.
At the carrier’s discretion, the Pre-seating function can be activated.
In this case, when going to this page, in the pop-up window (Fig. 055) the user will be offered specific seats in the cabin on each section of the route,
with the possibility to either accept the recommendation or select the seats on his/her own.

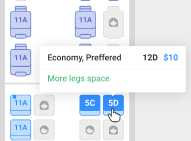
- Selecting the seat by the user is made using the built-in widget displaying the seat map
of the relevant aircraft (Fig. 056), scheduled for each flight segment in accordance with the flight schedule. 
- The ScreenTips (Fig. 057) allow the user to check the type of his/her seat and its cost.

- A detailed description (Fig. 058) illustrates the level of comfort of the specific seat.
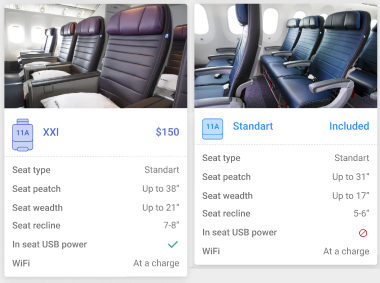

![]() Information about the characteristics and appearance of the seat is not mandatory and is submitted by the carrier upon its discretion.
Information about the characteristics and appearance of the seat is not mandatory and is submitted by the carrier upon its discretion.
The user can modify the selected seat in the cabin in two ways:
- For each passenger in the booking (Fig. 059):

- For each passenger in the booking (Fig. 060):

Information on the number and cost of the selected seats (Fig. 061) is displayed at the top of the page for each flight segment separately:

The user can cancel the selected seat both for one passenger in the order, and for all passengers on a certain flight section (Fig. 062):

If the route consists of several flight sections, move to the selection of seats for the next flight by clicking the ‘Next flight’ button (Fig. 063):
![]()
The total cost of the order is automatically updated, information is displayed at the bottom of the page (Fig. 064):

After the seats are selected, push the ‘Continue’ button to go to the next stage.
![]() If the user decides not to select the seat and follows the ‘Continue’ link, a corresponding warning will be displayed on the screen (Fig. 065):
If the user decides not to select the seat and follows the ‘Continue’ link, a corresponding warning will be displayed on the screen (Fig. 065):

Baggage
At this step, the user can add extra baggage.
Herewith, the total cost varies depending on the type and amount of baggage selected for each passenger (Fig. 066):

The user can select the baggage both separately on the To or From flight (Fig. 066) and for the entire route.
To do so, select the appropriate option in the baggage section (Fig. 067):

![]() If the user decides not to add the baggage and follows the ‘Continue’ link,
If the user decides not to add the baggage and follows the ‘Continue’ link,
the corresponding warning will be displayed on the screen (Fig. 068):

Meals
At this step, the user can select meals for each passenger separately on the entire route or on any particular flight (Fig. 069):

![]() At the carrier’s discretion, the function of the recommended meals order can be activated.
At the carrier’s discretion, the function of the recommended meals order can be activated.
In this case, when the user goes to the meals selection page in the pop-up window (Fig. 070),
he/she is offered specific meals with the possibility to accept the recommendation or select the meal himself/herself:

Due to the built-in widget, the user can preliminary select any of the available types of meals, relying on both a text description and images (Fig. 071):

![]() The list of meals is provided by the airline company. Using images is optional, at the discretion of the carrier.
The list of meals is provided by the airline company. Using images is optional, at the discretion of the carrier.
If the user books the flight for 2 or more passengers, the meals are selected for each passenger separately. The user has either to confirm or cancel the selection made (Fig. 072).

![]() By default, the number of meals per passenger is not limited,
By default, the number of meals per passenger is not limited,
but cannot exceed 5 meals of each type (the conditions can be defined by the airline company).
The total cost of the flight is automatically updated at the bottom of the page (Fig. 073):

![]() If the user decides not to select the meals and clicks ‘Continue’,
If the user decides not to select the meals and clicks ‘Continue’,
the corresponding warning will be displayed on the screen (Fig. 074):
