Difference between revisions of "Basic Operations"
| (15 intermediate revisions by 2 users not shown) | |||
| Line 56: | Line 56: | ||
== Setting the Date == | == Setting the Date == | ||
| + | |||
Date is presented in the '''DD.MM.YYYY''' format. | Date is presented in the '''DD.MM.YYYY''' format. | ||
| + | |||
To set the date manually, the “Calendar” widget may be used. | To set the date manually, the “Calendar” widget may be used. | ||
| − | You may either use this widget or specify date via keyboard in the '''DD.MM.YYYY''' format. | + | |
| + | [[File: calendar.png | center]] | ||
| + | |||
| + | {{Lamp | You may either use this widget or specify date via keyboard in the '''DD.MM.YYYY''' format.}} | ||
| + | |||
To set the date using the “Calendar” widget: | To set the date using the “Calendar” widget: | ||
| + | |||
#Click on a '''Date''' field. the Calendar widget will be shown. | #Click on a '''Date''' field. the Calendar widget will be shown. | ||
| − | #Set a month using | + | #Set a month using [[File: image037.png]] and [[File: image038.png]] icons. |
| − | #Set a year using | + | #Set a year using [[File: image039.png]] icon. |
#Select a date. | #Select a date. | ||
#Press '''OK'''. | #Press '''OK'''. | ||
== Working with Tables == | == Working with Tables == | ||
| + | |||
Table row usually contains only a brief summary about the element.</br> | Table row usually contains only a brief summary about the element.</br> | ||
| − | To view detailed information (expand a row), press | + | |
| − | To hide detailed information (collapse a row), press | + | [[File: image040.png | center]] |
| + | |||
| + | To view detailed information (expand a row), press [[File: image041.png]] icon in the left of the row.</br> | ||
| + | |||
| + | [[File: image042.png | center]] | ||
| + | |||
| + | To hide detailed information (collapse a row), press [[File: image043.png]] icon. The row will be shown in a default view.</br> | ||
| + | |||
Some of the tables may be sorted.</br> | Some of the tables may be sorted.</br> | ||
| + | |||
To sort the table, click on the name of the corresponding column. | To sort the table, click on the name of the corresponding column. | ||
== Downloading Data == | == Downloading Data == | ||
| + | |||
Some of the data can be downloaded in the *.csv file format.</br> | Some of the data can be downloaded in the *.csv file format.</br> | ||
| − | + | ||
| + | {{Lamp | This option is not available for all data.}}</br> | ||
To export data to a *.csv file and download it: | To export data to a *.csv file and download it: | ||
| + | |||
#Click right on a table row. | #Click right on a table row. | ||
#Select '''Export to CSV file''' item in the context menu. | #Select '''Export to CSV file''' item in the context menu. | ||
#Select the destination folder and press '''OK'''. </br> | #Select the destination folder and press '''OK'''. </br> | ||
| − | + | ||
| + | {{Lamp | Commas are used as delimiters in the file.}}</br> | ||
| + | |||
To view the file as a table, import data to a new *.xls(x) and set the delimiters: | To view the file as a table, import data to a new *.xls(x) and set the delimiters: | ||
| + | |||
#Run MS Excel application and create a new sheet there. | #Run MS Excel application and create a new sheet there. | ||
#On the '''Data''' tab select '''From text''' item. | #On the '''Data''' tab select '''From text''' item. | ||
| Line 89: | Line 111: | ||
#In the next window, press '''OK'''. | #In the next window, press '''OK'''. | ||
#If the Excel book contains several sheets, a window with sheet selection will be presented. There you may select a sheet where the imported data will be placed. Select one of the sheets and press '''OK'''. | #If the Excel book contains several sheets, a window with sheet selection will be presented. There you may select a sheet where the imported data will be placed. Select one of the sheets and press '''OK'''. | ||
| + | |||
The file contents will be presented in a table view. | The file contents will be presented in a table view. | ||
== Data Search == | == Data Search == | ||
| − | When different [ | + | |
| + | When different [[Working with the User Interface|System sections]] are opened, search forms are presented. To proceed to work with a specific system object, you should fill in a search form and find the object of interest. A search form example is presented on a figure below. | ||
| + | |||
| + | [[File: image044.png | center]] | ||
| + | |||
Each form contains mandatory and optional fields. If some of the mandatory fields are not filled in, then the search may not be started. To initiate the search, press the “proceed further” button on a search form (the name of this button may vary for different system sections) or the '''ENTER''' key on the keyboard. | Each form contains mandatory and optional fields. If some of the mandatory fields are not filled in, then the search may not be started. To initiate the search, press the “proceed further” button on a search form (the name of this button may vary for different system sections) or the '''ENTER''' key on the keyboard. | ||
| + | |||
== Copying Data == | == Copying Data == | ||
| + | |||
To copy data, right-click on data on a screen, which is to be copied, and in the context menu select the '''Copy''' item. The selected data will be copied to the clipboard. | To copy data, right-click on data on a screen, which is to be copied, and in the context menu select the '''Copy''' item. The selected data will be copied to the clipboard. | ||
| + | |||
| + | [[File: image045.png | center]] | ||
| + | |||
==See also== | ==See also== | ||
| − | *[[Working with the | + | *[[Working with the User Interface]] |
*[[User Profile and Personal Settings]] | *[[User Profile and Personal Settings]] | ||
*[[Working with Business rules]] | *[[Working with Business rules]] | ||
| + | |||
| + | [[Category:Inventory]] | ||
Latest revision as of 12:39, 2 September 2021
There are following basic operations:
- working with textbox fields
- setting date and period using the Calendar widget
- working with tables
- downloading data
- searching for data
- copying data.
Working with text Fields
Selecting Values in a Drop-Down List
Drop-down list is a set of predefined values. Drop-down lists are marked with the ![]() icon.
icon.
To select the value:
1. Click on the field. A list of values will be shown.
2. Select an item in the list. Value in the list will be set.
To search values in the list by first letters, open the list and then type first letters in the field. The list will contain only values starting with the specified letter.
The Route Field
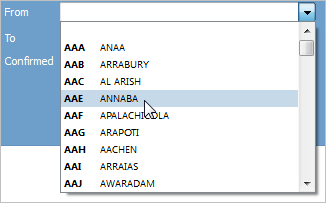
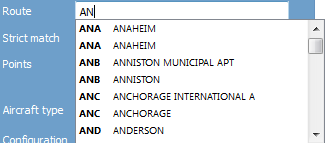
The Route field is a specific field used for setting a flight route.
To specify the route:
1. Click on the field. A list containing a reference of route points will be shown.
2. Select a value from the list. Chosen value will be shown in the field.
| The Route field is filled in correctly only if each of the items is displayed as shown in figure above! |
3. Specify remaining points of the route one by one, following the order until the whole route of flight is specified in the Route field.
4. Press Enter. specified route points will be confirmed as a fully formed route.
You can specify a route point using the keyboard. Type the full name of a route point (e. g. LED) and press Space. If a specified value was found in the list by full match, a route point will be displayed and shown on a figure (screenshots will be available later). If the value was not found, specify another value or search for it in the list.
The Frequency Field
The Frequency field is a specific field used for setting a flight operation frequency.
Frequency should be specified in the 1234567 format, where each number refers to a day of the week: 1 is for Monday, 2 is for Tuesday etc.
For example, to set a frequency to “Monday, Wednesday, Friday, Sunday”, specify the 1357 value.
To specify that the flight is operated every second week, set the mark in the Every 2nd week check box.
Setting the Date
Date is presented in the DD.MM.YYYY format.
To set the date manually, the “Calendar” widget may be used.
To set the date using the “Calendar” widget:
- Click on a Date field. the Calendar widget will be shown.
- Set a month using
 and
and  icons.
 - Set a year using
 icon.
icon. - Select a date.
- Press OK.
Working with Tables
Table row usually contains only a brief summary about the element.
To view detailed information (expand a row), press ![]() icon in the left of the row.
icon in the left of the row.
To hide detailed information (collapse a row), press ![]() icon. The row will be shown in a default view.
icon. The row will be shown in a default view.
Some of the tables may be sorted.
To sort the table, click on the name of the corresponding column.
Downloading Data
Some of the data can be downloaded in the *.csv file format.
To export data to a *.csv file and download it:
- Click right on a table row.
- Select Export to CSV file item in the context menu.
- Select the destination folder and press OK.
To view the file as a table, import data to a new *.xls(x) and set the delimiters:
- Run MS Excel application and create a new sheet there.
- On the Data tab select From text item.
- Select a *.csv file.
- Select data format With delimiters and press Next.
- Select as a delimiter items Tab character and Comma, and press Next.
- In the next window, press OK.
- If the Excel book contains several sheets, a window with sheet selection will be presented. There you may select a sheet where the imported data will be placed. Select one of the sheets and press OK.
The file contents will be presented in a table view.
Data Search
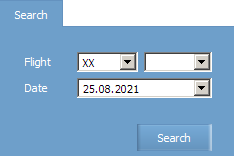
When different System sections are opened, search forms are presented. To proceed to work with a specific system object, you should fill in a search form and find the object of interest. A search form example is presented on a figure below.
Each form contains mandatory and optional fields. If some of the mandatory fields are not filled in, then the search may not be started. To initiate the search, press the “proceed further” button on a search form (the name of this button may vary for different system sections) or the ENTER key on the keyboard.
Copying Data
To copy data, right-click on data on a screen, which is to be copied, and in the context menu select the Copy item. The selected data will be copied to the clipboard.


